Showing posts with label tutorials. Show all posts

Sunday, August 20, 2017

BabylonJS Solar System or at least a sun with some planets


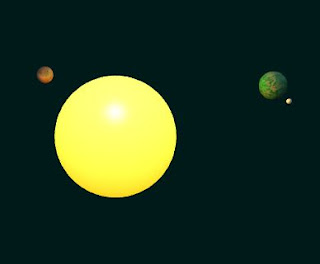
Recently I've started to experiment a bit with BabylonJS. Its nice WebGL framework for web. As an exercise I made this small example - moving and rotating solar system.

You can check the working example here - WebGL Solar System


Here is the full source code of the example: solar.js
var canvas;
var engine;
var scene;

var sun;
var planet1;
var planet2;
var planet2Moon;

function start() {
    canvas = document.getElementById("renderCanvas");
        
    engine = new BABYLON.Engine(canvas, true);    
    
    scene = createScene();
    
    engine.runRenderLoop(function () {
        scene.render();
    });
    
    var c = 0;
    var i = 0;
    scene.beforeRender = function () {
  planet1.position = new BABYLON.Vector3(20 * Math.sin(c), 0, 20 * Math.cos(c));
                
                planet2.position = new BABYLON.Vector3(30 * Math.sin(i), 3 * Math.cos(i), 30 * Math.cos(i));
  moon.position = new BABYLON.Vector3(5 * Math.sin(c), moon.parent.position.y, 5 * Math.cos(c));
    
  c += 0.005;
                i += 0.008;     
    };
    
    window.addEventListener("resize", function () {
        engine.resize();
    });
}

var createScene = function () {

    var scene = new BABYLON.Scene(engine);

    scene.clearColor = new BABYLON.Color3(0, 0.1, 0.1);

   var camera = new BABYLON.ArcRotateCamera("ArcRotateCamera", 1, 0.8, 50, new BABYLON.Vector3(0, 0, 0), scene);
   camera.attachControl(canvas, false);
    
    var light = new BABYLON.HemisphericLight("light1", new BABYLON.Vector3(0, 1, 0), scene);    
    light.intensity = 0.5;
    light.diffuse = new BABYLON.Color3(1, 1, 1);
    
    var light0 = new BABYLON.PointLight("Omni0", new BABYLON.Vector3(1, 10, 1), scene);
    light0.diffuse = new BABYLON.Color3(1, 0.5, 0);
    light0.specular = new BABYLON.Color3(1, 1, 1);
        
    sun = BABYLON.Mesh.CreateSphere("sun", 20.0, 20.0, scene, false,  BABYLON.Mesh.DEFAULTSIDE);
    
    var sunmaterial = new BABYLON.StandardMaterial('sunmaterial', scene);    
    sunmaterial.diffuseColor = new BABYLON.Color3(1.00, 1.00, 1.00);
    sunmaterial.emissiveColor = new BABYLON.Color3(1.00, 0.72, 0.00);
    sunmaterial.ambientColor = new BABYLON.Color3(0.94, 0.85, 0.36);
    sunmaterial.specularColor = new BABYLON.Color3(1.00, 1.00, 1.00);
    sun.material = sunmaterial;
    
    planet1 = BABYLON.Mesh.CreateSphere("planet1", 10.0, 3.0, scene, false,  BABYLON.Mesh.DEFAULTSIDE);            
    var planet1mat = new BABYLON.StandardMaterial('planet1mat', scene);    
    var planet1mat_diffuseTexture = new BABYLON.Texture('assets/planet1.png', scene); 
    planet1mat.diffuseTexture = planet1mat_diffuseTexture;
    planet1mat.specularColor = new BABYLON.Color3(0, 0, 0);
    planet1.material = planet1mat;
    
    var frameRate = 10;
    var yRotate = new BABYLON.Animation("yRotate", "rotation.y", frameRate, BABYLON.Animation.ANIMATIONTYPE_FLOAT, BABYLON.Animation.ANIMATIONLOOPMODE_CYCLE);
    var keyFramesR = []; 
    keyFramesR.push({
        frame: 0,
        value: 0
    });
    keyFramesR.push({
        frame: frameRate,
        value: Math.PI
    });
    keyFramesR.push({
        frame: 2 * frameRate,
        value: 2 * Math.PI
    });
    yRotate.setKeys(keyFramesR);
    scene.beginDirectAnimation(planet1, [yRotate], 0, 2 * frameRate, true);   
    
    planet2 = BABYLON.Mesh.CreateSphere("planet2", 10.0, 5.0, scene, false,  BABYLON.Mesh.DEFAULTSIDE);        
    moon = BABYLON.Mesh.CreateSphere("moon", 3.0, 1.0, scene, false,  BABYLON.Mesh.DEFAULTSIDE);
    moon.translate(planet2.position, 5, BABYLON.Space.WORLD);
    moon.parent = planet2;
    
    var planet2mat = new BABYLON.StandardMaterial('planet2mat', scene);    
    var planet2mat_diffuseTexture = new BABYLON.Texture('assets/planet2.jpg', scene); 
    planet2mat.diffuseTexture = planet2mat_diffuseTexture;    
    planet2mat.specularColor = new BABYLON.Color3(0, 0, 0);
    
    planet2.material = planet2mat;
    
    var yRotate = new BABYLON.Animation("yRotate", "rotation.y", frameRate/2, BABYLON.Animation.ANIMATIONTYPE_FLOAT, BABYLON.Animation.ANIMATIONLOOPMODE_CYCLE);
    yRotate.setKeys(keyFramesR);
    scene.beginDirectAnimation(planet2, [yRotate], 0, 2 * frameRate, true);   
    
    return scene;

  };

Tuesday, April 7, 2015

List of top AndEngine tutorials - android game programming

Andengine is fun, little game engine for android. Its not exactly easy, don't have clear documentation and has some other problems, but actually its pretty amazing stuff that helps you develop android games faster. It handles a lot of work for you and lets you focus on the actual gameplay. Here is a list of some good AndEngine tutorials.


Monday, March 23, 2015

HTML5 basics - practical tutorial for game development(part 2)

HTML5 basics - practical tutorial for game development(part 1)
Lets start with part two of our tutorial. In this part I'll show how you can draw with html5 canvas. I'll try to keep the examples as simple as possible, just focusing on one feature at a time.
Basic drawing is actually easy. You can see how to draw a line from the last example in part 1I will continue with drawing a rectangle and then drawing a circle.

Friday, November 14, 2014

HTML5 basics - practical tutorial for game development(part 1)

HTML5 is a markup language of the internet used for structuring and presenting content for the WWW and bla bla. You can read all the detailed explanations for what HTML5 is from Wikipedia. This tutorial is not for that as I am trying to be more practical and provide you with fast start.

First you need an editor. You can work with notepad or something more fancy. I prefer to use something with code completion and some other useful features. Good choice for this is Netbeans. There are some lightweight editors but I haven't tried any of them as Netbeans is doing good work for me.


Sunday, January 13, 2013

How to embed sounds and music in FlashDevelop AS3 project

Its really easy. Lets have soundfile sound.mp3 in folder music.

        [Embed(source='../music/sound.mp3')]        
        private var musicClass : Class;        
        private var mymusic : Sound;

And then this:

         myMusic = (new musicClass) as Sound;                 
         myMusic.play();

Here is the full sourcecode:

package 
{
   
    public class MusicTest
    {
       
        [Embed(source='../music/sound.mp3')]         
        private var musicClass : Class;         
        private var myMusic : Sound;
       
        public function MusicTest()
        {
            myMusic = (new musicClass) as Sound;         
        }
       
        public function playMusic():void {
            myMusic.play();
        }
       
    }

}

Monday, November 5, 2012

How to make simple shooting game like Balloon Hunt

For this tutorial I'll use only FlashDevelop as its easier this way. You can easily adapt it later to build with the Flash Ide.

So lets describe our game first. We will have flying targets all over the screen and we will click on them with the mouse in order to shoot them. You can play the original game here Balloon Hunt 2. First we will add the targets.

Now lets start with new AS3 project with size 640x480 and 50fps. Here is the stub code:

package  
{
 import flash.display.*;
 import flash.utils.*;
 import flash.events.*;
 
 public class Game extends MovieClip
 {  
  public function Game() 
  {   
  }  
 }
}
Now I'll add an array for our targets:
private var targets:Array = new Array();
And a separate class for our targets. Its a very simple class that extends MovieClip and we will use its graphics object to draw a circle in it.
 import flash.display.*;
 
 public class Target extends MovieClip
 {

  public var hit:Boolean = false;

  public function Target() 
  {
   graphics.beginFill(0xff0000);
   graphics.drawCircle(0, 0, 30);
  }
  
 }
And a function to our game class to start the game:
 
 import flash.display.*;
 import flash.utils.*;
 import flash.events.*;
 
 public class Game extends MovieClip
 {
  
  private var targets:Array = new Array();
  
  public function Game() 
  {
   startGame();
  }
  
  private function startGame() : void {
   var target:Target = new Target();
   target.x = 320;
   target.y = 240;
   this.addChild(target);
   this.addEventListener(Event.ENTER_FRAME, gameLoop);   
  }
  
  private function gameLoop(e:Event) :void {
   
  }
  
 }

Here you will see several things. First we add a target to our game just to see something on the screen. Next or actually first we call our function startGame from the constructor. And last we add a function that will be called every frame:
this.addEventListener(Event.ENTER_FRAME, gameLoop);
This will be our game loop. Now you can run the project and see what we get - a lonely target stuck at the center of our game. Lets change this - we will add target on regular basis. We need a counter for this - targetCounter.
private var targetCounter:int;
  
private const TARGETCOUNTER:int = 1000;
And we will add the variable lastTime:
private var lastTime:int;
And a code to the gameLoop function to track how much time have passed.
   if(lastTime == 0) lastTime = getTimer();
   var timeDiff:int = getTimer() - lastTime;
   lastTime += timeDiff;
Here is the full code:
 import flash.display.*;
 import flash.utils.*;
 import flash.events.*;
 
 public class Game extends MovieClip
 {
  
  private var targets:Array = new Array();
  
  private var lastTime:int;
  
  private var targetCounter:int;
  
  private const TARGETCOUNTER:int = 500;
  
  public function Game() 
  {
   startGame();
  }
  
  private function startGame() : void {
   lastTime = 0;
   targetCounter = 0;
   this.addEventListener(Event.ENTER_FRAME, gameLoop);   
  }
  
  private function gameLoop(e:Event) :void {
   if(lastTime == 0) lastTime = getTimer();
   var timeDiff:int = getTimer() - lastTime;
   lastTime += timeDiff;
  }
  
 }
Now we will start with adding targets and moving them around. I want to mention that the code is not optimized but I think it will be easier for beginners to understand it this way. Here is how we change the game loop now:
  private function gameLoop(e:Event) :void {
   if(lastTime == 0) lastTime = getTimer();
   var timeDiff:int = getTimer() - lastTime;
   lastTime += timeDiff;
   
   // next target counter
   targetCounter -= timeDiff;
   
   if (targetCounter <= 0) {
    // add new target
    var target:Target = new Target();
    target.x = -30;
    target.y = Math.random() * 480; // random
    this.addChild(target);
    targets.push(target);
    targetCounter = TARGETCOUNTER;
   }
   // move all targets
   for (var i:int = targets.length - 1; i >= 0; i--) {
    var tg:Target = targets[i];
    tg.x += timeDiff * 0.1;
    // check if the target is outside the screen
    if (tg.x > 670) { // 640 + 30
     this.removeChild(tg);
     targets.splice(i, 1);
    }
   }
  }
And here is the result:

Now its time to add the action. We will add the function mouseDown:
  private function mouseDown(e:MouseEvent) {
   
  }
And at startGame we will add this row:
this.addEventListener(MouseEvent.MOUSE_DOWN, mouseDown);
And here is the full code of mouseDown:
  private function mouseDown(e:MouseEvent):void {
   if (e.target is Target) {
    var target:Target = e.target as Target;
    target.hit = true;
   }
  }
And now we must change the part where we check if we must remove a target:
    if (tg.x > 670 || tg.hit) { // 640 + 30
     this.removeChild(tg);
     targets.splice(i, 1);
    }
And that's it all. Here is the full code if you've missed something:
Game.as
package  
{
 
 import flash.display.*;
 import flash.utils.*;
 import flash.events.*;
 
 public class Game extends MovieClip
 {
  
  private var targets:Array = new Array();
  
  private var lastTime:int;
  
  private var targetCounter:int;
  
  private const TARGETCOUNTER:int = 1000;
  
  public function Game() 
  {
   startGame();
  }
  
  private function startGame() : void {
   lastTime = 0;
   targetCounter = 0;
   this.addEventListener(Event.ENTER_FRAME, gameLoop);  
   this.addEventListener(MouseEvent.MOUSE_DOWN, mouseDown);
  }
  
  private function gameLoop(e:Event) :void {
   if(lastTime == 0) lastTime = getTimer();
   var timeDiff:int = getTimer() - lastTime;
   lastTime += timeDiff;
   
   // next target counter
   targetCounter -= timeDiff;
   
   if (targetCounter <= 0) {
    // add new target
    var target:Target = new Target();
    target.x = -30;
    target.y = Math.random() * 480; // random
    this.addChild(target);
    targets.push(target);
    targetCounter = TARGETCOUNTER;
   }
   // move all targets
   for (var i:int = targets.length - 1; i >= 0; i--) {
    var tg:Target = targets[i];
    tg.x += timeDiff * 0.1;
    // check if the target is outside the screen
    if (tg.x > 670 || tg.hit) { // 640 + 30
     this.removeChild(tg);
     targets.splice(i, 1);
    }
   }
  }
  
  private function mouseDown(e:MouseEvent):void {
   if (e.target is Target) {
    var target:Target = e.target as Target;
    target.hit = true;
   }
  }
  
 }

}
Target.as
package  
{
 
 import flash.display.*;
 
 public class Target extends MovieClip
 {
  
  public var hit:Boolean = false;
  
  public function Target() 
  {
   graphics.beginFill(0x00ff00);
   graphics.drawCircle(0, 0, 30);
   graphics.endFill();
  }
  
 }

}
And the final result:


Saturday, February 11, 2012

How to make space shooter game with ActionScript 3 and FlashDevelop - part 2

Part 1
Now lets continue with our game. In the init function remove the hello world code and add this row:
startGame();

and right afrer the init function we will add startGame:
private function startGame():void {
 this.addEventListener(Event.ENTER_FRAME, gameLoop);
}
And now the game loop:
private function gameLoop(event:Event = null):void {
           
}

It is time to add the player. Lets make new folder called assets and add some images to it. For player spaceship I’ll use this cool image:

and for enemies this one:

You can use my images but please credit me.
Lets start with adding the player. More about embedding images you can learn from this post - FlashDevelop, ActionScript3 and images.
Add this in the class body:
[Embed(source="../assets/s1.png")]
private var playerShipImage:Class;
       
private var player:MovieClip;

And now alter the startGame function this way:
private function startGame():void {
   player = new MovieClip();
   var bitmap:Bitmap = new playerShipImage();
   bitmap.x = -bitmap.width / 2;
   bitmap.y = -bitmap.height / 2;
   player.addChild(bitmap);   
   player.x = 250;
   player.y = 430;
   addChild(player);
   this.addEventListener(Event.ENTER_FRAME, gameLoop);
  }
Compile and run! Here is the result:

And here is the full source code till now:
Main.as
package 
{
 import flash.display.*;
 import flash.events.*;


 public class Main extends Sprite 
 {
  
  [Embed(source="../assets/s1.png")]
  private var playerShipImage:Class;
  
  private var player:MovieClip;
  
  public function Main():void 
  {
   if (stage) init();
   else addEventListener(Event.ADDED_TO_STAGE, init);
  }
  
  private function init(e:Event = null):void 
  {
   removeEventListener(Event.ADDED_TO_STAGE, init);
   // entry point
   startGame();
  }
  
  private function startGame():void {
   player = new MovieClip();
   var bitmap:Bitmap = new playerShipImage();
   bitmap.x = -bitmap.width / 2;
   bitmap.y = -bitmap.height / 2;
   player.addChild(bitmap);   
   player.x = 250;
   player.y = 430;
   addChild(player);
   this.addEventListener(Event.ENTER_FRAME, gameLoop);
  }
  
  private function gameLoop(event:Event = null):void {
   
  }
  
 }
 
}
Part 1

FlashDevelop and ActionScript 3 - how to embed image - fast tip

When you use the official flash ide, using images is as easy as clicking several buttons. Actually using images with FlashDevelop is even easier but if you haven't done it you will need this info.
First copy the desired image into folder of the project, for example I'll name my folder assets.
Add a variable to your class:
private var myImg:Class;
And place your cursor on the row above it. Right mouse button on the image and select Generate Embed Code:


You will get something like this:

[Embed(source="../assets/s1.png")]
private var myImg:Class;

Add this where you want to use the image:

var bitmap:Bitmap = new myImg();
addChild(bitmap);

Easy, isn't it?

Wednesday, November 2, 2011

How to make space shooter game with ActionScript 3 and FlashDevelop - part 1

As I mentioned in this post (How to make flash games without the expensive Flash IDE) you can make flash games and earn money without buying the Flash IDE. Actually, its very easy and I prefer to make my games this way. Here I’ll show very basic example that is appropriate even for beginners.

What do you need for this tutorial?
FlashDevelop - http://www.flashdevelop.org
Flex SDK - http://opensource.adobe.com/wiki/display/flexsdk/Flex+SDK

The basics

Let’s begin. Create new AS3 project and name it as you like. I’ll use the name Shooter for it.
This is what will be created for you.
And this is the content of Main.as:
package
{
   import flash.display.*;
   import flash.events.*;
   
   public class Main extends Sprite
   {
       
       public function Main():void
       {
           if (stage) init();
           else addEventListener(Event.ADDED_TO_STAGE, init);
       }
       
       private function init(e:Event = null):void
       {
           removeEventListener(Event.ADDED_TO_STAGE, init);
           // entry point
       }
       
   }
   
}
Add
trace(“Hello World”);
as the last row of the init function:
private function init(e:Event = null):void
       {
           removeEventListener(Event.ADDED_TO_STAGE, init);
           // entry point
        trace(“Hello World”);
       }
Now build and run your project. If everything is done wright you must see “Hello World” at the output window.

Let’s make some changes. First lets change the size and the frame rate. Go to Project->properties and make these changes:

Now our game will be 500x500 and will run at 50 fps(most of the time).

How to make space shooter game with ActionScript 3 and FlashDevelop - part 2

Friday, August 19, 2011

List of tutorials for beginner game developers - Flash and ActionScript

Here is a list of good Flash and ActionScript tutorials for game makers. If you want to learn more about how to make flash games consider reading them all.

Avoider Game Tutorial
http://gamedev.michaeljameswilliams.com/2008/09/17/avoider-game-tutorial-1/
Really good and detailed game tutorial.

Flash game creation tutorial
http://www.emanueleferonato.com/2006/10/29/flash-game-creation-tutorial-part-1/
Another good and long game tutorial.

Tile Based Games
http://www.tonypa.pri.ee/tbw/start.html
If you are serious on making games read this one too.

Make a Flash game like Flash Element Tower Defense
http://www.emanueleferonato.com/2007/10/06/make-a-flash-game-like-flash-element-tower-defense-part-1/
Good tower defense game tutorial.

How to create Tower Defense in ActionScript 3
http://www.flashgametuts.com/tutorials/advanced/how-to-create-a-tower-defense-game-in-as3-part-1/
Great tutorial!

How to make a vertical shooter
http://www.flashgametuts.com/tutorials/as3/how-to-make-a-vertical-shooter-in-as3-part-1/
Detailed and useful tutorial on making a shooter game.

How to create a Platform Game in AS3
http://www.flashgametuts.com/tutorials/as3/how-to-create-a-platform-game-in-as3-part-1/
If you want to make platform game read this one.

Build Tower Defense in ActionScript2
http://www.goofballgames.com/2009/10/25/building-a-tower-defense-game-in-flash-as2/
Its better to use ActionScript 3 but you can always get the idea and make the changes.

Complete Bejeweled Game
http://www.emanueleferonato.com/2010/12/16/complete-bejeweled-game-in-less-than-2kb/
How to make Bejeweled-like games - the tutorial is very detailed and not too hard.

Jigsaw Game tutorial
http://www.actionscript.org/resources/articles/13/1/Jigsaw-Puzzle/Page1.html